KubeInit External access for OpenShift/OKD deployments with Libvirt
- Posted on August 25, 2020
- kubernetes, kubeinit, cloud, okd
- By Carlos Camacho
In this post it will be described the basic network architecture when OKD is deployed using KubeInit in a KVM host.
Note 2021/10/13: DEPRECATED - This tutorial only works with kubeinit 1.0.2 make sure you use this version of the code if you are following this tutorial, or refer to the documentation to use the latest code.
TL;DR;
We will describe how to extend the basic network configuration to provide external access to the cluster services by adding an external IP to the service machine.
What is KubeInit?
KubeInit provides Ansible playbooks and roles for the deployment and configuration of multiple Kubernetes distributions.
The main goal of KubeInit is to have a fully automated way to deploy in a single command a curated list of prescribed architectures.
KubeInit is opensource, and licensed under the Apache 2.0 license. The project’s source code is hosted in GitHub.

Initial hypervisor status
We check both the routing table and the network connections in the hypervisor host.
[root@nyctea ~]# route
Kernel IP routing table
Destination     Gateway         Genmask         Flags Metric Ref    Use Iface
default         _gateway        0.0.0.0         UG    100    0        0 eno1
10.19.41.0      0.0.0.0         255.255.255.0   U     100    0        0 eno1
192.168.122.0   0.0.0.0         255.255.255.0   U     0      0        0 virbr0
[root@nyctea ~]# nmcli con show
NAME         UUID                                  TYPE      DEVICE
System eno1  162499bc-a6fa-45db-ba76-1b45f0be46e8  ethernet  eno1
virbr0       4ba12c69-3a8b-42e8-a9dd-bc020fdc1a90  bridge    virbr0
eno2         e19725f2-84f5-4f71-b300-469ffc99fd99  ethernet  --
enp6s0f0     7348301f-8cae-4ab1-9061-97d7a344699c  ethernet  --
enp6s0f1     8a96c226-959a-4218-b9f7-c3ab6ee3d02b  ethernet  --
As it is possible to see there are two physical network interfaces (eno1, and eno2) for which only one is actually connected.
Initial network architecture
The following picture represents the default network layout for a usual deployment.
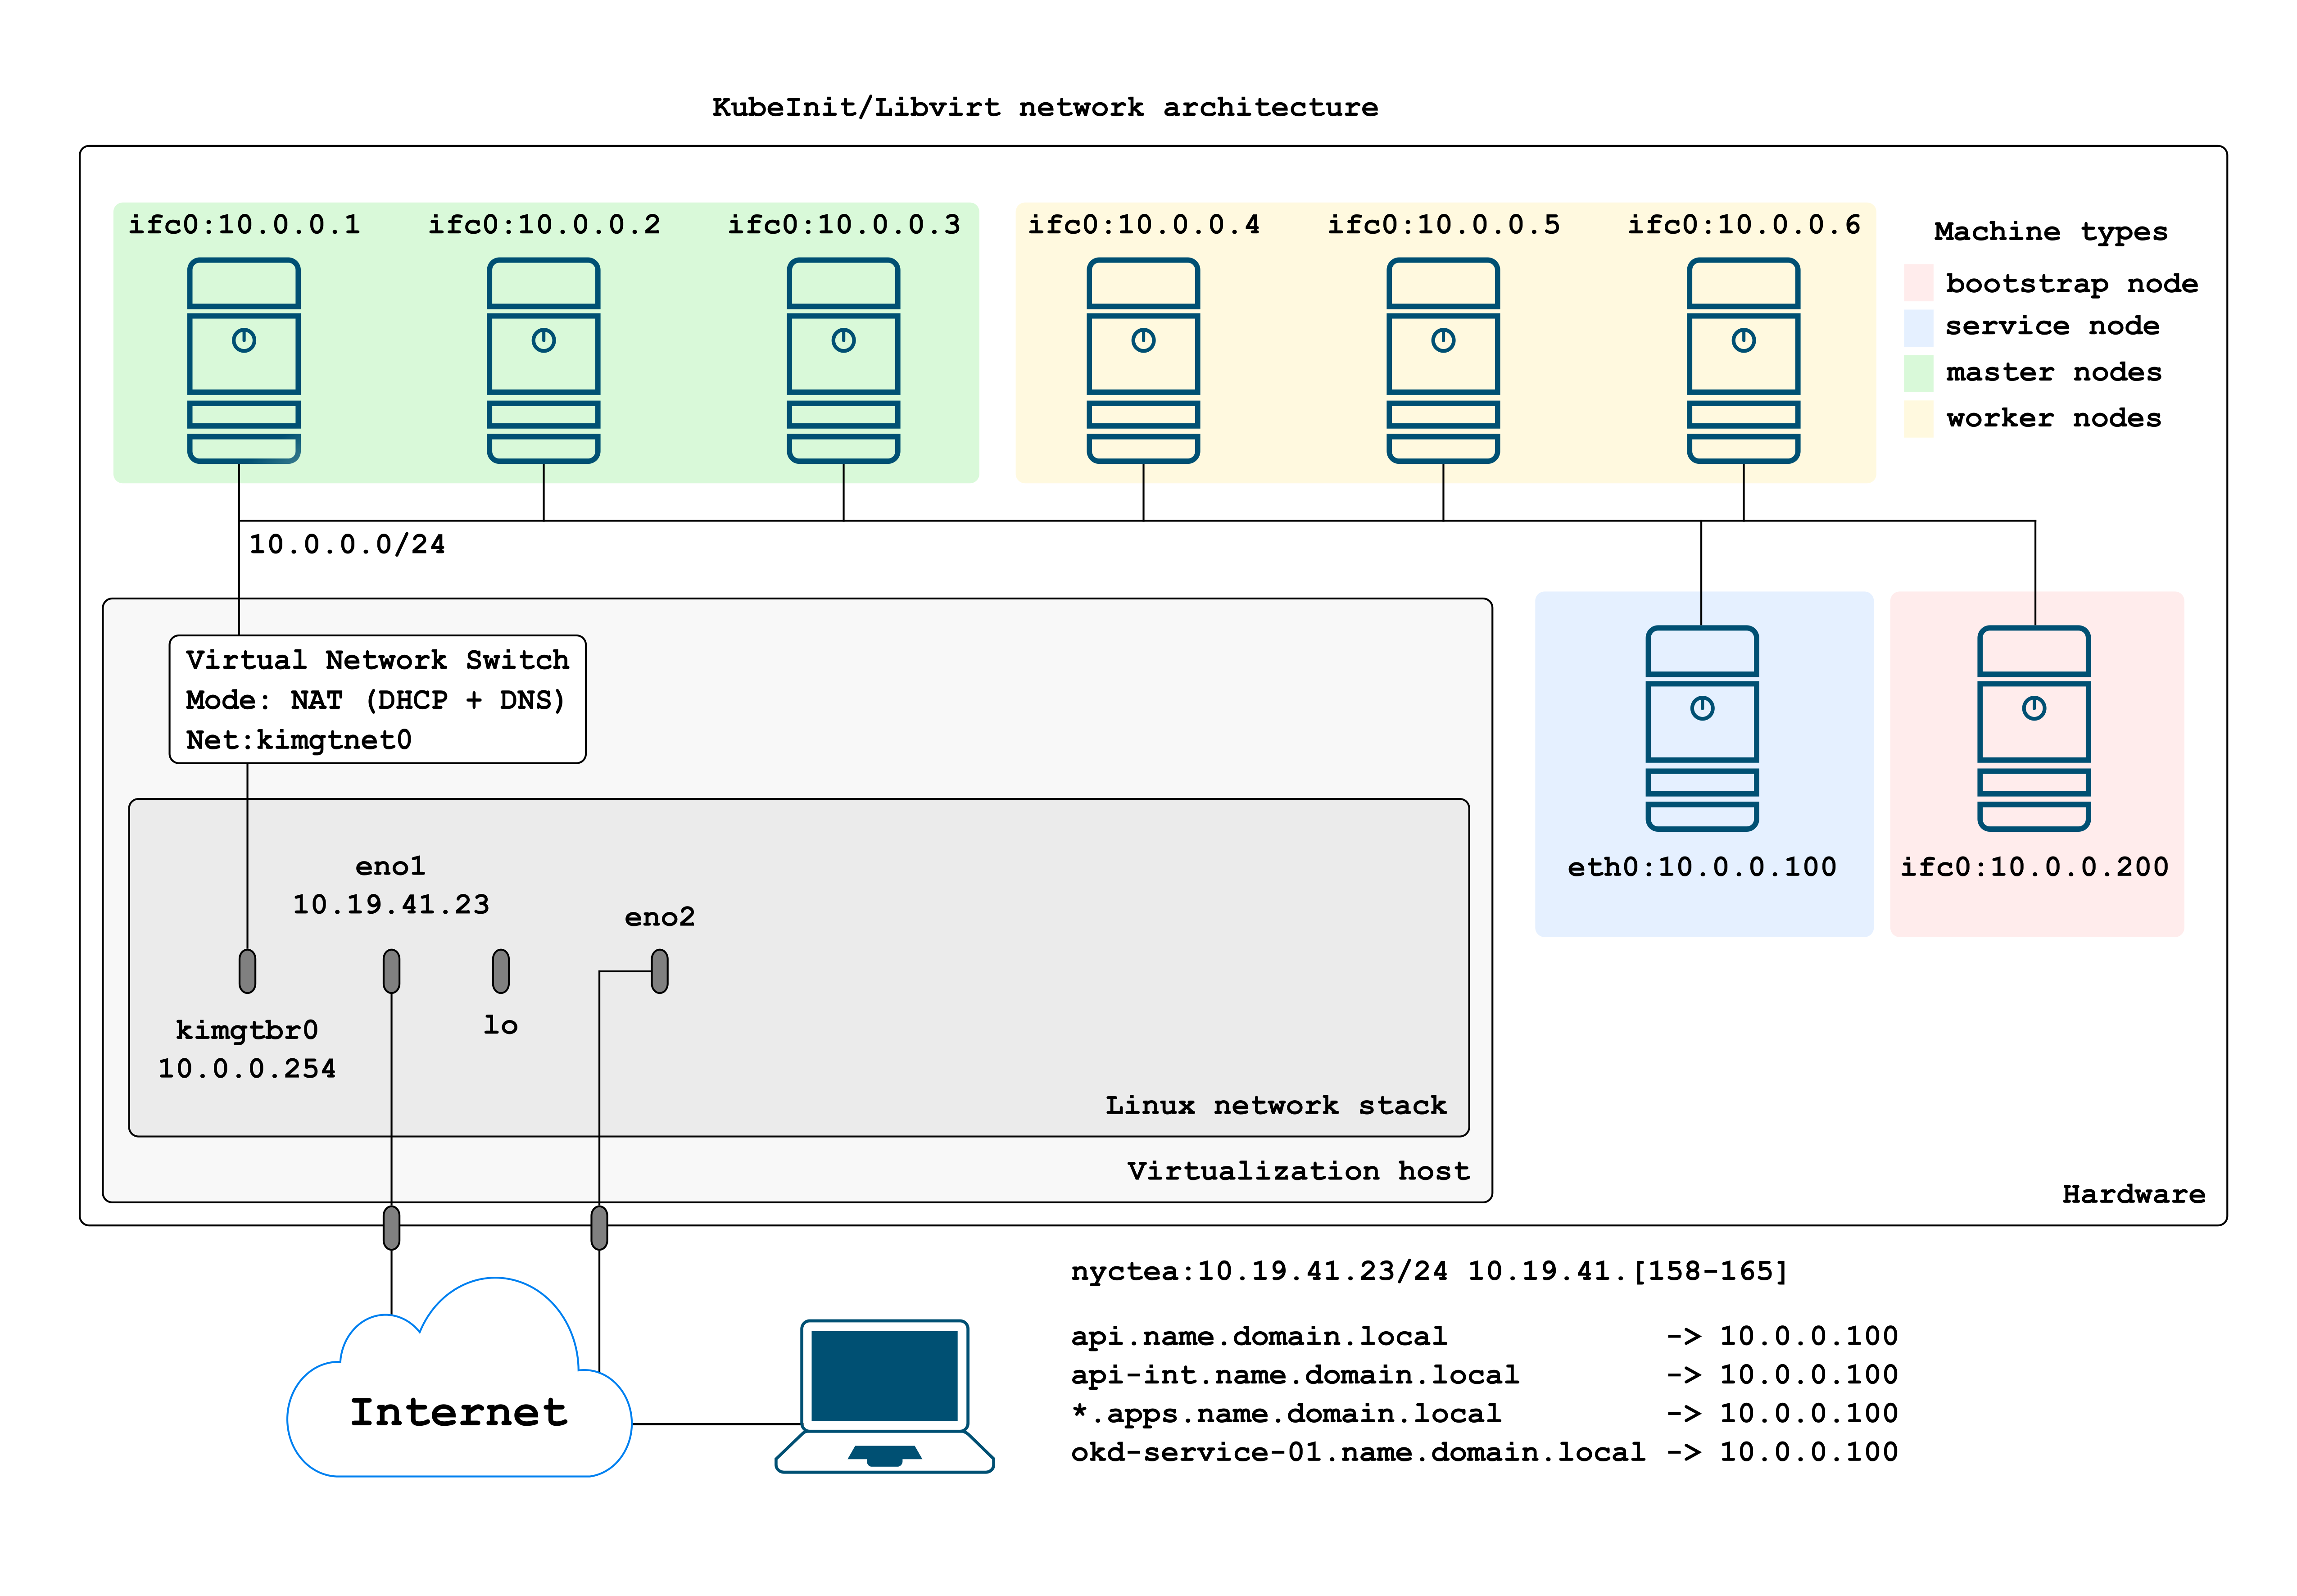
The default deployment will install a multi-master cluster, with one worker node (up to 10). From the above figure is possible to see:
-
All cluster nodes are connected to the 10.0.0.0/24 network. This will be the cluster management network, and the one will use to access the nodes within the hypervisor.
-
The 10.0.0.0/24 network is defined as a Virtual Network Switch implementing both NAT and DCHP for any interface connected to the
kimgtnet0network. -
All bootstrap, master, and worker nodes are installed with Fedora CoreOS as is the required OS for OKD > 4.
-
The services machine has installed CentOS 8 with BIND, HAProxy, and NFS.
-
Using DHCP, we assign the following IP mapping based on the MAC address of each node (defined in the Ansible inventory).
 # Master
 okd-master-01 ansible_host=10.0.0.1 mac=52:54:00:aa:6c:b1
 okd-master-02 ansible_host=10.0.0.2 mac=52:54:00:59:0e:e4
 okd-master-03 ansible_host=10.0.0.3 mac=52:54:00:b4:39:45

 # Worker
 okd-worker-01 ansible_host=10.0.0.4 mac=52:54:00:61:22:5a
 okd-worker-02 ansible_host=10.0.0.5 mac=52:54:00:21:fd:fd
 okd-worker-03 ansible_host=10.0.0.6 mac=52:54:00:4c:0a:81
 okd-worker-04 ansible_host=10.0.0.7 mac=52:54:00:54:ff:ac
 okd-worker-05 ansible_host=10.0.0.8 mac=52:54:00:4a:6b:f6
 okd-worker-06 ansible_host=10.0.0.9 mac=52:54:00:40:22:52
 okd-worker-07 ansible_host=10.0.0.10 mac=52:54:00:6c:0a:03
 okd-worker-08 ansible_host=10.0.0.11 mac=52:54:00:0b:14:f8
 okd-worker-09 ansible_host=10.0.0.12 mac=52:54:00:f5:6e:e5
 okd-worker-10 ansible_host=10.0.0.13 mac=52:54:00:5c:26:4f

 # Service
 okd-service-01 ansible_host=10.0.0.100 mac=52:54:00:f2:46:a7

 # Bootstrap
 okd-bootstrap-01 ansible_host=10.0.0.200 mac=52:54:00:6e:4d:a3
The previous deployment can be used for any purpose but it has one limitation, this limitation is that the endpoints do not have external access. This means that i.e. https://console-openshift-console.apps.watata.kubeinit.local can not be accessed from anywhere instead the hypervisor itself.
Extending the basic network layout
Now it will be described a simple way to provide external access to the cluster public endpoints published in the service machine.
Requirements
- An additional IP address to be mapped to the services machine from an external location.
- Creating a network bridge to slave the interface used for the external access.
If a user has one extra IP (public or private) it will be enough to configure remote access to the cluster endpoints.
As long as we have an extra IP it does not matter how many physical interfaces we have, as we can have multiple IP addresses configured using a single physical NIC.
New network layout
This is the resulting network architecture to access remotely our freshly installed OKD cluster.
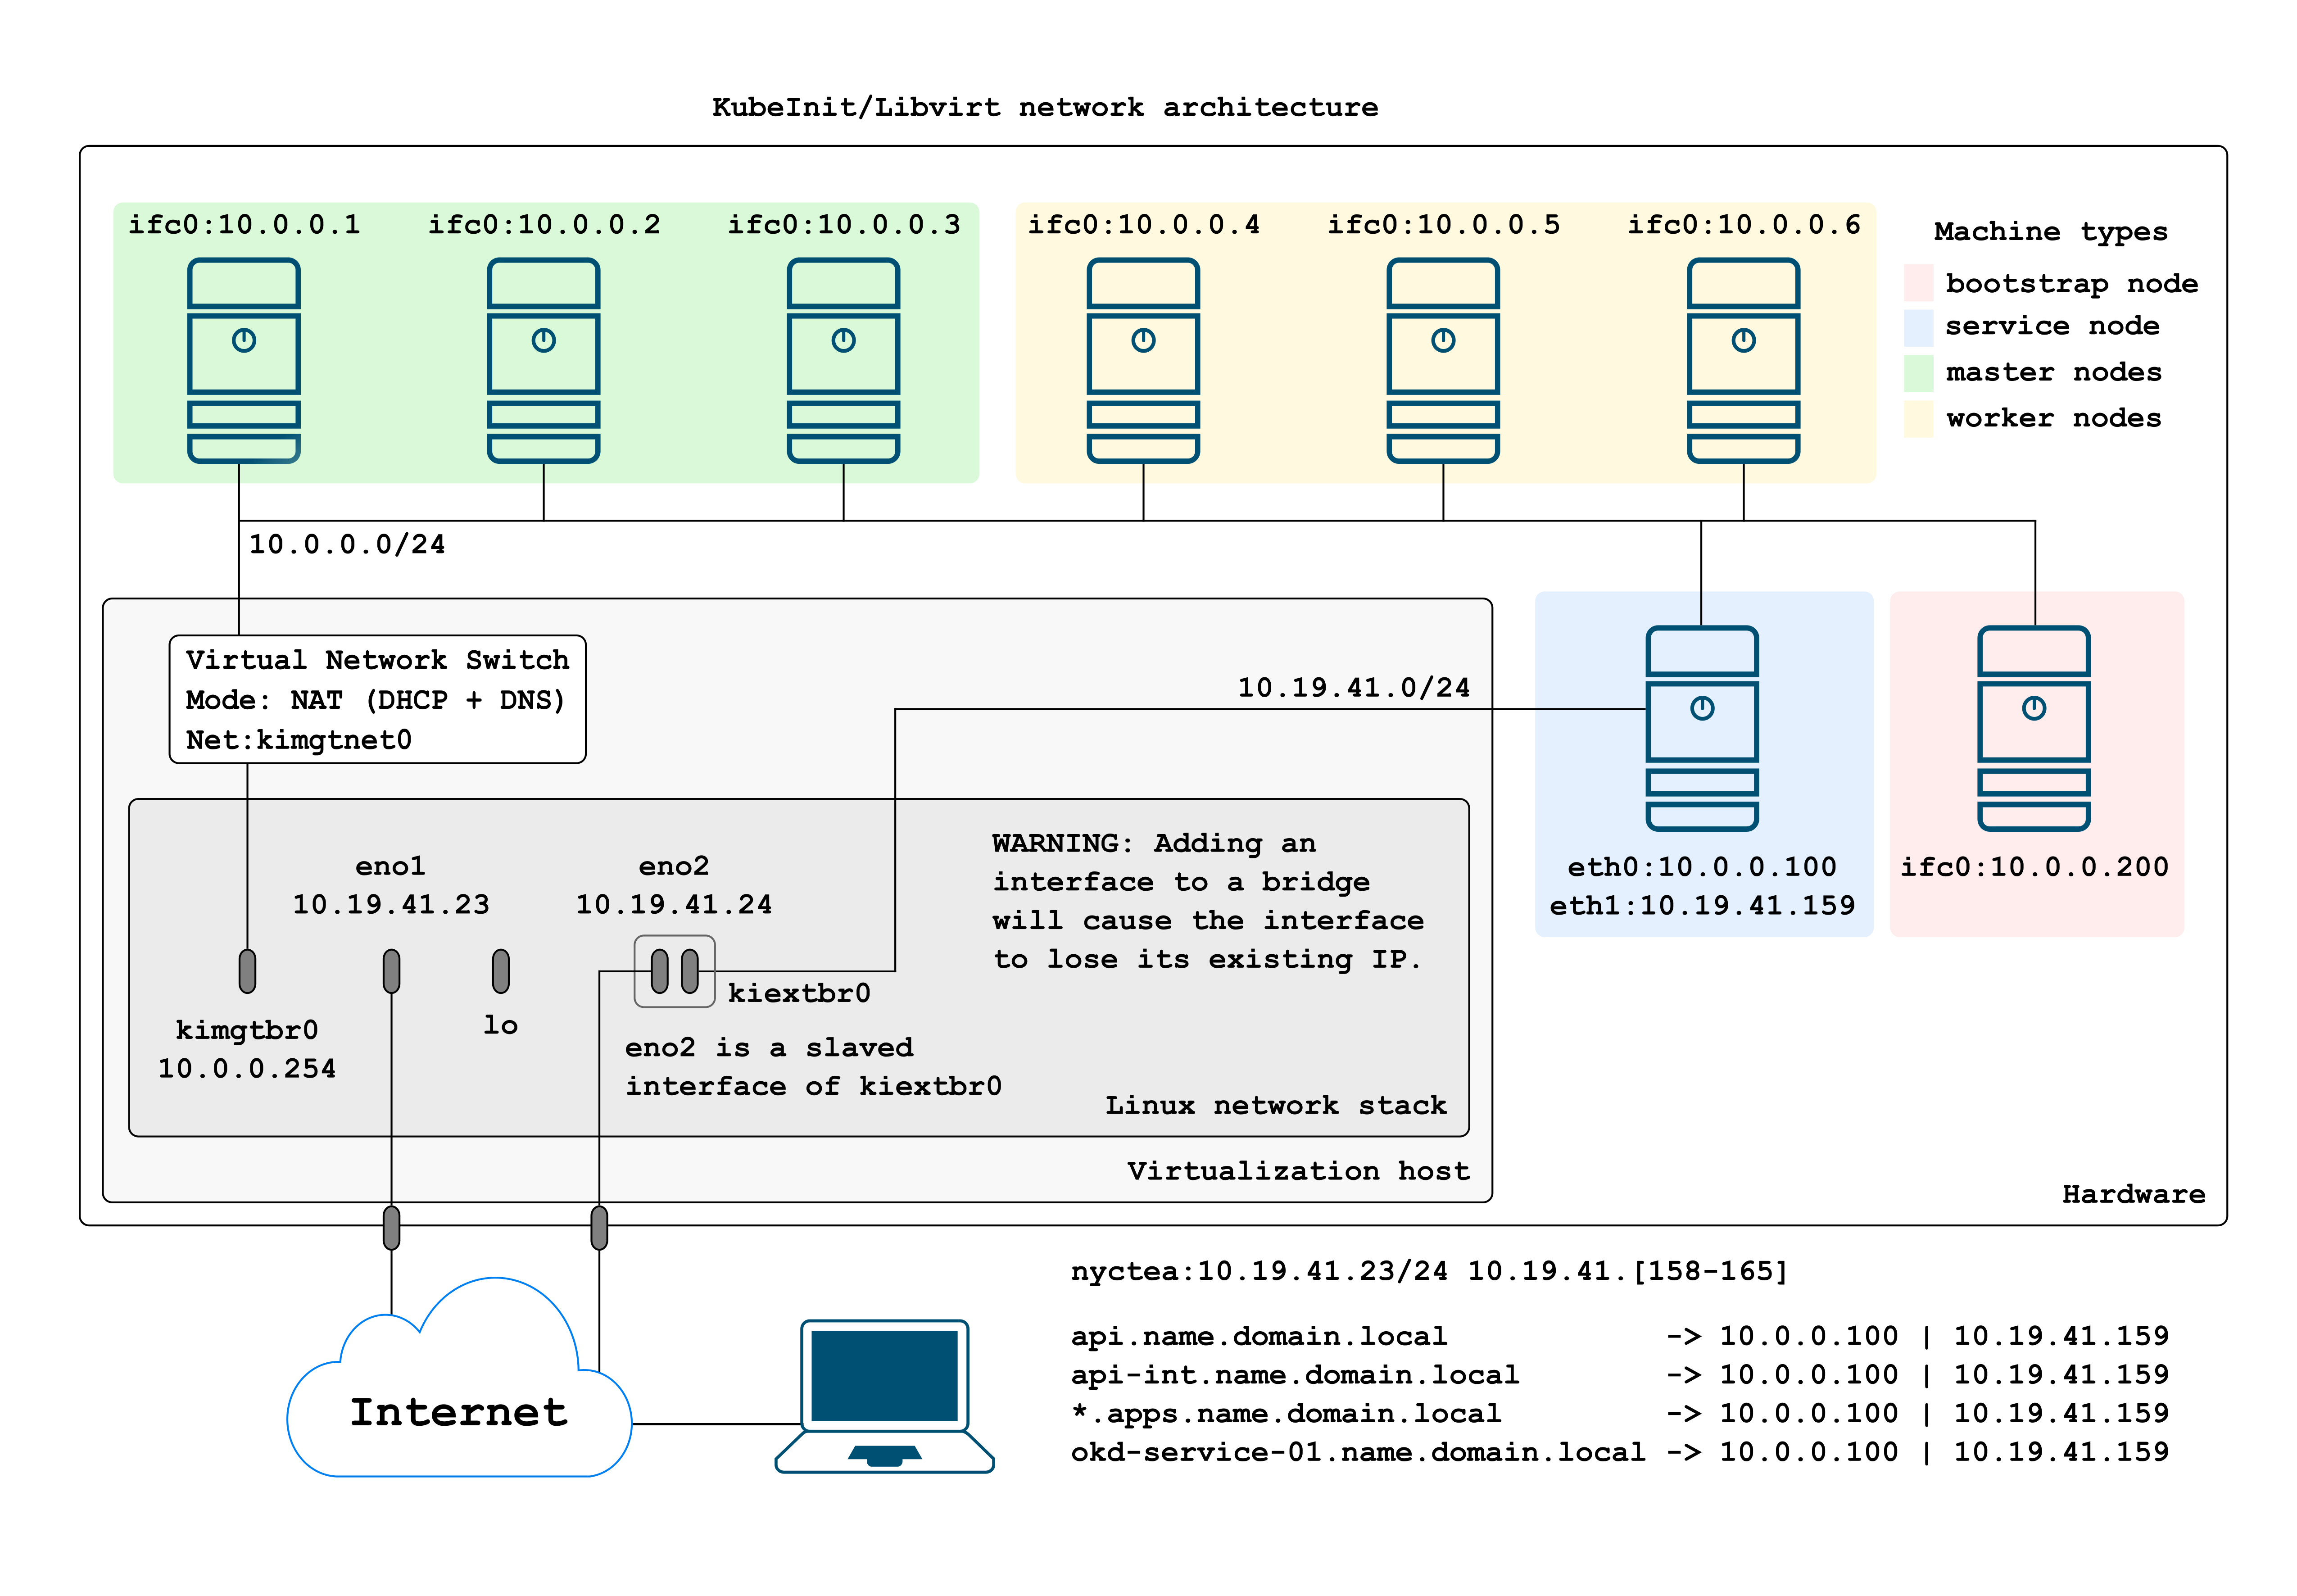
As is visible in the above figure there is an extra connection to the service machine, connected directly to the virtual bridge slaving a physical interface.
Our development environment has only one network card connected, in this case after we create the main switch and slave the network device, it will lose the assigned IP automatically. Do not try this using a shell as you will get dropped.
How to enable the external interface
To deploy this architecture please follow the next steps:
- Create a virtual bridge slaving the selected physical interface.
- Adjust the deployment command.
- Run KubeInit.
- Adjust your local Domain Name System (DNS) resolver.
Step 1 (creating the virtual bridge)
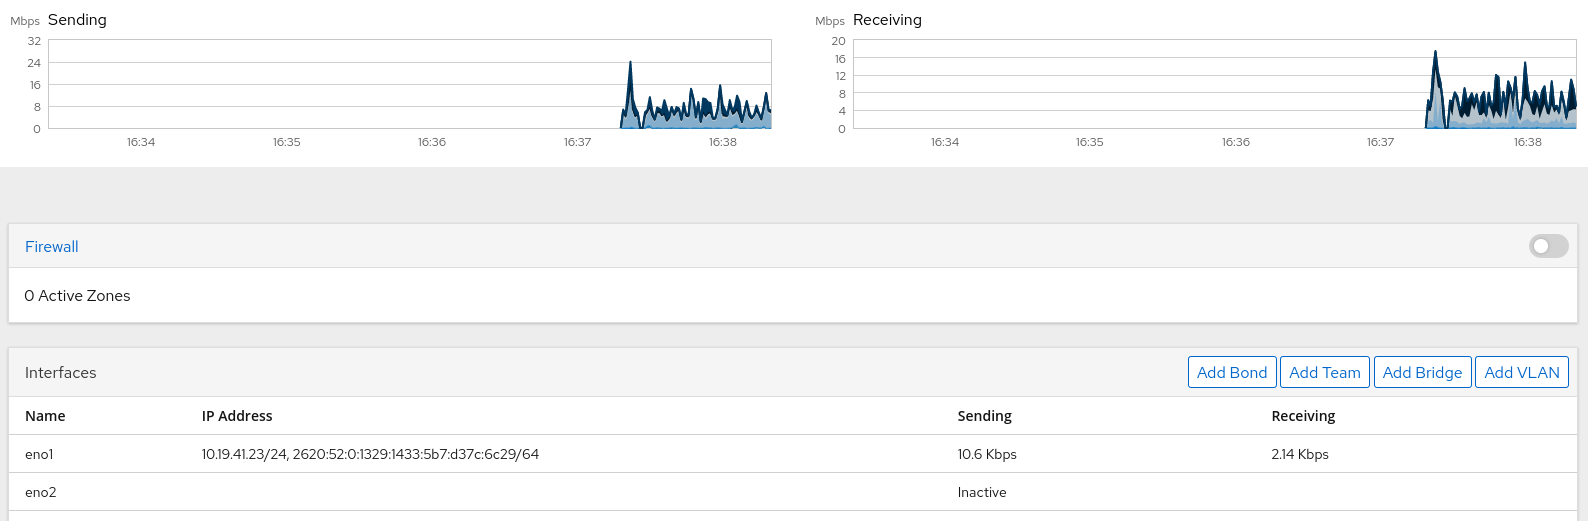
Using CentOS8 cockpit
We create an initial bridge using the CentOS cockpit, after losing the IP it will be recovered/reconfigured automatically (don’t try this from the CLI as you will lose access).
In this case,
Create a bridge called kiextbr0 connected to eno1:
Click on: Networking -> Add Bridge
Then adjust the bridge configuration options (bridge name and the interface to slave).

Write: kiextbr0 as the bridge name, and select your network interface eno1.
Go to the dashboard and verify that everything is OK.
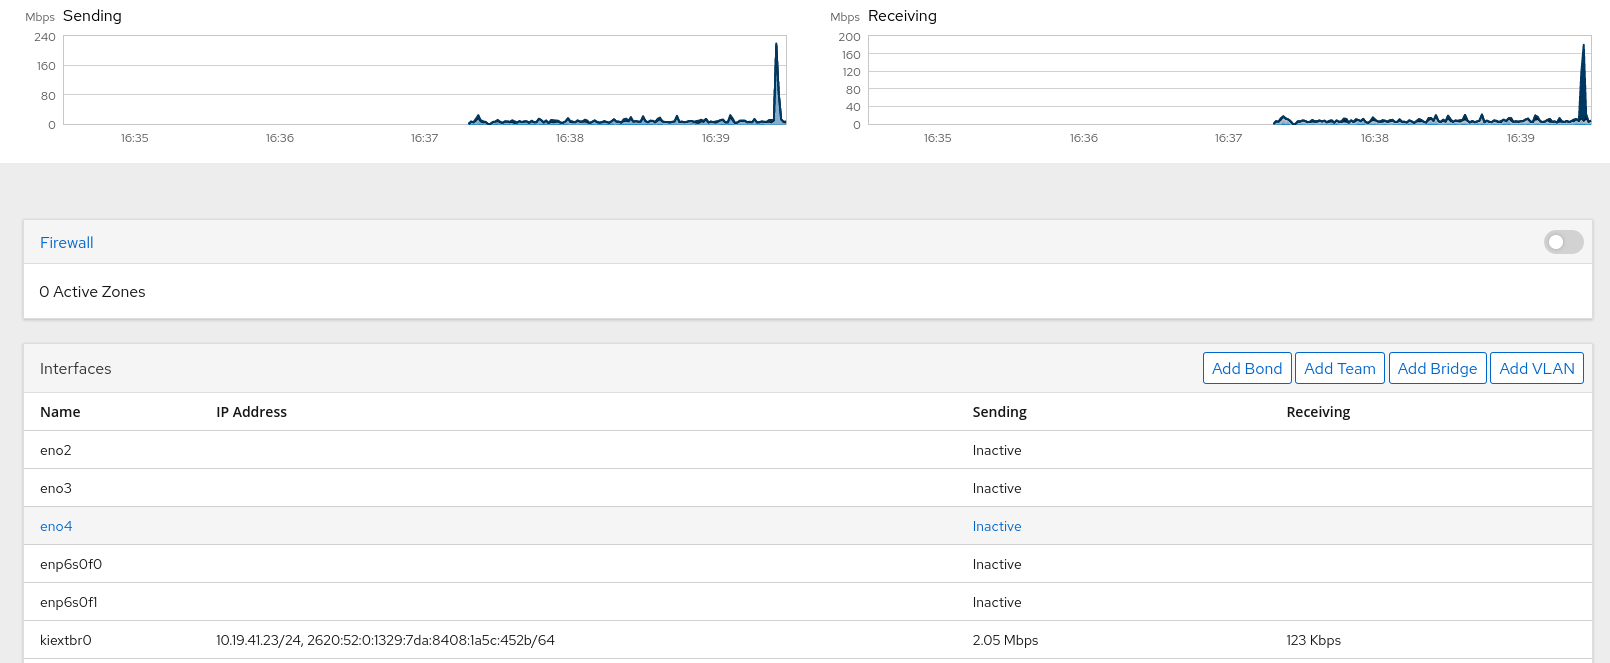
Check that the bridge is created correctly and has the IP configured correctly.
Manual bridge creation
As an example you can run these steps by the CLI adjusting your interface and bridge names accordingly.
nmcli connection add ifname br0 type bridge con-name br0
nmcli connection add type bridge-slave ifname enp0s25 master br0
nmcli connection modify br0 bridge.stp no
nmcli connection delete enp0s25
nmcli connection up br0
NOTE: If you have only one interface the connection will be dropped and you will. lose connectivity.
Checking the system status
We check again the system status:
[root@nyctea ~]# route
Kernel IP routing table
Destination     Gateway         Genmask         Flags Metric Ref    Use Iface
default         _gateway        0.0.0.0         UG    425    0        0 kiextbr0
10.0.0.0        0.0.0.0         255.255.255.0   U     0      0        0 kimgtbr0
10.19.41.0      0.0.0.0         255.255.255.0   U     425    0        0 kiextbr0

NAME         UUID                                  TYPE      DEVICE
kiextbr0     55d0a549-8123-488a-815b-5771b62644d2  bridge    kiextbr0
kimgtbr0     3e73e0d9-28bd-4db7-8ccf-be11297e3300  bridge    kimgtbr0
System eno1  3251ed0c-706a-463e-aeac-2a57782ce7c1  ethernet  eno1
vnet0        4515a0b8-1a20-4414-86b2-2ff5545fcffa  tun       vnet0
vnet1        5f1b253f-9c38-4637-8a02-222aa5c51be3  tun       vnet1
vnet2        e7d466d5-bc2b-47b0-a6ca-5a3825170501  tun       vnet2
eno2         190c35fb-1ff0-41ff-b32e-c190f513b2a0  ethernet  --
eno3         1b644415-0a91-44a9-bfd0-2279ddca0020  ethernet  --
eno4         c99ba8a7-b62c-4b1f-b191-8798f0eff2ff  ethernet  --
enp6s0f0     11c63800-8cd9-4411-8854-43ced2a464f3  ethernet  --
enp6s0f1     be01957b-2933-47df-9793-156fe3b1d767  ethernet  --
We can see we have the new bridge created successfully and it has the IP address also configured correctly.
Step 2 (adjusting the deployment command)
There are a few variables that need to be adjusted in order to successfully configure the external interface.
These variables are defined in the libvirt role (the location of these variables will change) but not their name.
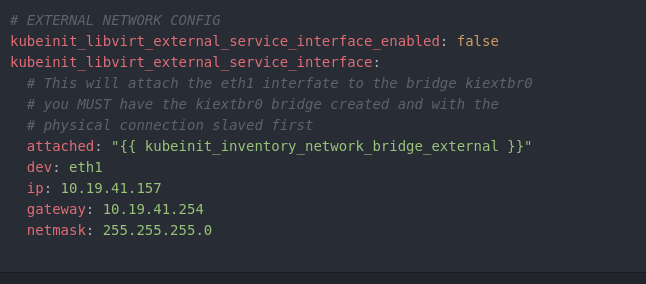
The meaning of the variables are:
-
kubeinit_libvirt_external_service_interface_enabled: true - This will enable the Ansible configuration of the external interface, the BIND update, and the additional interface in the service node.
-
kubeinit_libvirt_external_service_interface.attached: kiextbr0 - This is the virtual bridge where we will plug the
eth1interface of the services machine. The bridgeMUSTbe created first and slaving the physical interface we will use. -
kubeinit_libvirt_external_service_interface.dev: eth1 - This is the name of the external interface we will add to the services machine.
-
kubeinit_libvirt_external_service_interface.ip: 10.19.41.157 - The external IP address of the services machine.
-
kubeinit_libvirt_external_service_interface.gateway: 10.19.41.254 - The gateway IP address of the services machine.
-
kubeinit_libvirt_external_service_interface.netmask: 255.255.255.0 - The network mask of the external interface of the services machine.
After we configure correctly the previous variables we can proceed to run the deployment command.
Step 3 (run the deployment command)
Now we deploy as usual KubeInit:
Remember that you can execute this deployment command before creating the bridge with the CentOS cockpit, the bridge creation has no impact in how we deploy KubeInit.
ansible-playbook \
    -v \
    --user root \
    -i ./hosts/okd/inventory \
    --become \
    --become-user root \
    -e "{ \
      'kubeinit_libvirt_external_service_interface_enabled': 'true', \
      'kubeinit_libvirt_external_service_interface': { \
        'attached': 'kiextbr0', \
        'dev': 'eth1', \
        'ip': '10.19.41.157', \
        'mac': '52:54:00:6a:39:ad', \
        'gateway': '10.19.41.254', \
        'netmask': '255.255.255.0' \
      } \
    }" \
    ./playbooks/okd.yml
Step 4 (adjust your resolv.conf)
You must reach the cluster external endpoints by DNS, this means, the dashboard and any other application deployed (you can add entries for any registry pointing to the service machine but this can be cumbersome).
For example, configure your local DNS resolver to point to 10.19.41.157
 [ccamacho@localhost]$ cat /etc/resolv.conf
 nameserver 10.19.41.157
 nameserver 8.8.8.8
After that you should be able to access the cluster without any issue and use it for any purpose you have with the following URL https://console-openshift-console.apps.clustername0.kubeinit.local/.
Voilà!
Final considerations
Some of the very interesting changes in BIND is how we manage both external and internal views.

In this case we have an internal and external view that will behave differently depending
on where the requests are originated from.
If a DNS request is created trough the cluster’s external interface, the reply will be
created based on the external view, in this case we only reply with the external HAProxy endpoints
related to the services node, thus, we will only reply with 10.19.41.157 as it is the only that needs
to be presented externally.
The end
If you like this post, please try the code, raise issues, and ask for more details, features or anything that you feel interested in. Also it would be awesome if you become a stargazer to catch up updates and new features.
This is the main project repository.
Happy KubeIniting!
Updated 2020/08/25: First version (draft).
Updated 2020/08/26: Published.
Updated 2020/10/06: Update in network details.
Responses
Want to leave a comment? Visit this post's issue page on GitHub (you'll need a GitHub account. What? Like you already don't have one?!).